Natural-looking results can be achieved using multiple color shade combinations to blend vital and restored teeth after restoration, while removing the least amount of tooth structure and fewest number of teeth. Many consider cosmetic cases to be the most difficult in dentistry not only because of the technical aspects of preparation, impressions, and cementation, but also the psychological element. While their essential function in eating is obvious, the front teeth also play an important part in emotional well-being. These teeth have always been the ones people value most. That is why, when trying to improve these teeth, from function to appearance, it is important to make every effort to preserve as much good tooth as possible. Depending on the circumstances, saving tooth structure may result in uneven preparations for the same teeth in an arch. In those cases, the choice of different resin cements in terms of color, translucency, and opacity becomes an integral part of the case and can affect its final esthetic outcome
Patient History
Patient History
The chief complaint of this young male patient, who had been in the authors’ practice for several years, was the color, shape, and length combination of his upper four front teeth (Figure 1). He was especially concerned about the color difference between his two front teeth. He reported that he had received endodontic treatment of his maxillary left central incisor (Figure 2) after a motorcycle accident as a teenager. A cosmetic evaluation revealed darkening of tooth No. 9 from this past trauma, different tooth lengths, an uneven gum line, and broken off incisal edges on his four front teeth (Figure 3). Thorough clinical, radiographic, photographic, tooth shape, and length examinations were conducted.
Treatment Planning
The patient used The Smile Style Guide™ (Digident, www.digident.com) to select what he considered to be the most attractive smile for his look and personality. He chose R-2, rounded canines, to match his somewhat flat-round canines with square centrals and square-round laterals; and he selected L-1 for the length combination, or centrals about the same length as the cuspids and laterals that were slightly shorter. With the aid of a trial smile made from a wax-up of the maxillary incisors, it was determined—with the patient’s input—that the optimal treatment would consist of placing four upper minimal-preparation porcelain veneers after receiving deep bleaching through a combination of in-office and take-home splints (AcquaBrite™, AcquaMed Technologies, Inc, www.acquamedtech.com.)
Treatment Implementation and Modifications
While excellent results were achieved with the whitening on most of his teeth, the incisors—particularly teeth Nos. 8, 9, 10, 23, and 24—did not respond as well. Minimum preparation of his upper anterior incisors accentuated the color differences in these four teeth. Preparation shades were matched: A2 for Nos. 7 and 10, A3 for No. 8, and A4 for No. 9 (Figure 4). Then, the preliminary transitional impressions were taken before refining the prepared teeth.

Figure 1
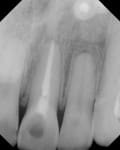
Figure 2
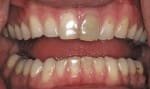
Figure 3
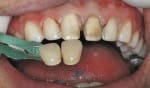
Figure 4
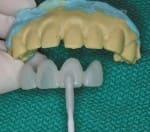
Figure 5
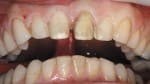
Figure 6
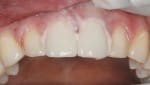
Figure 7
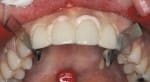
Figure 8
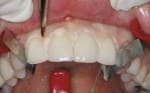
Figure 9
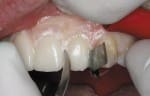
Figure 10
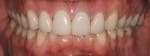
Figure 11

Figure 12
Identic syringeable hydrocolloid (Dux Dental, www.duxdental.com) was placed to capture greater detail of the preparations. At the same time, an assistant loaded Identic alginate (Dux Dental) into a quadrant stock tray to be seated immediately over the hydrocolloid.After disinfecting and air-drying the impression, the assistant poured the Mach-Slo PVS™ (Parkell, www.parkell.com) in the in-office laboratory. Fast-setting Blu-Mousse® (Parkell) was placed onto the Mach-Slo for the base. Once the silicone model and base were set, the provisionals could be made using the original matrix from the diagnostic wax-up. A water-based lubricant such as K-Y Jelly® (Johnson and Johnson, www.k-y.com) was placed onto the model as a separator prior to seating the matrix filled with PERFECtemp® II bis-acryl (Discus Dental, www.discusdental.com). The bis-acryl set up in 90 seconds and was trimmed and polished with various burs in the laboratory. When handling cases involving multiple, consecutive teeth, this efficient temporization method provides a simple, accurate way to create attractive provisionals with minimal effort that is easier on the tissues—all outside of the patient’s mouth and mostly by a trained assistant (Figure 5). The provisionals were seated with Insure resin cement (Cosmedent, www.cosmedent.com) and no primer. The excess was then removed prior to light-curing it in place.
At the seating appointment, the transitionals were removed. Because the preparations were all in enamel, the patient felt no discomfort, and the final restorations were tried in without the use of anesthetic. This enabled the patient to experience how his new smile—with the four front teeth increased—would look and feel. Various shades of Prevue (Cosmedent) try-in pastes were used in different combinations to determine the most natural and esthetic smile for the patient. Using this “mix to match method” makes it possible to seamlessly handle esthetic cases involving different porcelain types and thicknesses, such as the feldspathic porcelain (Willi Geller Creation, Jensen Dental, www.jensendental.com) used in this case.
At the seating appointment, the transitionals were removed. Because the preparations were all in enamel, the patient felt no discomfort, and the final restorations were tried in without the use of anesthetic. This enabled the patient to experience how his new smile—with the four front teeth increased—would look and feel. Various shades of Prevue (Cosmedent) try-in pastes were used in different combinations to determine the most natural and esthetic smile for the patient. Using this “mix to match method” makes it possible to seamlessly handle esthetic cases involving different porcelain types and thicknesses, such as the feldspathic porcelain (Willi Geller Creation, Jensen Dental, www.jensendental.com) used in this case.
Shade Selection
Subtlety is the key to creating a natural-looking smile starting with the brightest in the front and gradually getting warmer toward the back teeth. When mimicking teeth shades in nature, the centrals generally tend to be brighter and lighter, so the corresponding cement shades are used while incrementally darker or warmer shades are used moving toward the distal. In most of the authors’ cases, the veneers are first tried in with Prevue Clear try-in gel to verify fit and color. However, because the underlying tooth of No. 9 was much darker than the adjacent teeth (Figure 6), Prevue White Opaque try-in gel was chosen in this case to block out the darkness. The White Opaque seemed to give the teeth a slightly bluish hue, so the veneers were carefully removed and rinsed with water to remove the try-in gel. Prevue Pink Opaque try-in gel was then placed in the centrals, and this looked more natural (Figure 7). Once the shade of the try-in gels was determined for the centrals, the veneers were left in place to see which combination of try-in gels would bring the laterals into harmony with the centrals. Da Vinci (Cosmedent) try-in gels were selected and tried in for the laterals, first with Brighter, and then with Bright. As both of these shades were too bright, Prevue try-in gel in the Yellow Red Light shade was tried in the laterals for a warmer look. Because the laterals still looked too bright, they were tried in with Prevue try-in gel in the Yellow Red Universal shade. It was ultimately decided, with the patient’s input, that the most esthetically pleasing combination for the four front porcelain veneer cements would be Pink Opaque for the centrals and Yellow Red Universal for the laterals.
Finalizing the Restorations
Once the various try-in pastes were tried in for the most harmonious and natural-looking smile and the patient approved, nitrous oxide could then be started. Topical and local anesthesias were administered and a retractor was placed to create a dry field. First, the prepared teeth were microetched and etched. The Complete Kit (Cosmedent) bonding system was used from a fresh bottle to ensure the strongest potential bond. Insure cements in Pink Opaque for the centrals and Yellow Red Universal for the laterals were used to seat the veneers (Figure 8). A synthetic fiber brush (Cosmedent) was used to remove the excess cement prior to curing (Figure 9) and the teeth were then cured from all angles with the Sapphire® Plasma Arc Curing Light (DenMat, www.denmat.com). After ensuring a thorough curing of the restorations, a #12 Bard-Parker™ blade (BD Medical, www.bd.com) was used to remove the bulk of the excess cement (Figure 10). Interproximal finishing and polishing was refined with FlexiStrips (Cosmedent) while Porcelize (Cosmedent) and Enamelize (Cosmedent) diamond porcelain polishing pastes were used thereafter to achieve a final luster.
Conclusion
Though the try-in pastes required a little more chairtime, the end results proved the time was well spent. The patient appreciated the extra steps that were taken to ensure a seamless smile, especially considering his initial presentation. To achieve the most natural-looking results, the least amount of tooth structure was removed and the fewest teeth possible were restored (Figure 11). Using a variety of veneer cements in multiple shade combinations helped to yield the most esthetic, yet most natural, smile (Figure 12).
Acknowledgment
Special thanks to Cornelia Ferenschuetz, CDT for her artistic contribution in creating the esthetic porcelain restorations for this case.
Disclosure
The authors have received honorarium from Cosmedent for this article.
About the Authors
Lorin Berland, DDS
Private Practice
Dallas, Texas
Sarah Kong, DDS
Private Practice
Dallas, Texas Dentist
