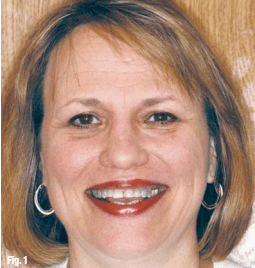
This 61-year-old executive has lived with the effects of tetracycline-stained teeth since she was a little girl (Fig. 1). All her life she wanted to have a great smile, but she never knew what her dental options were. The general dentist she had seen for many years told her there was nothing he could do to help her, so he referred her to our office. When the patient came for her first visit, she wished to address a number of dental concerns. In addition to the severe tetracycline staining, she felt her teeth were
worn from years of grinding. Moreover, she had old resin bonding on her lower front teeth that was not only discoloured, but also mismatched from years of patching and re-patching each time something broke off.
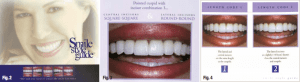
After performing a thorough examination (paying particular attention to the areas noted above) and cleaning, we recommended she try deep bleaching. After evaluating the results of the whitening, we recommended a minimum of four minimal preparation Microveneers for her lower front teeth and her upper seven teeth, and a zirconium porcelain crown for tooth #5, in order to achieve the smile she desired. Because her maxillary six anteriors had worn, flat incisal edges, it was essential that we understood what the patient desired in terms of shape and length. We examined the Smile Style Guide (www.digident.com) to select a smile design (Fig. 2). With the patient’s input, we determined that P3—pointed canines with square centrals and round laterals—would be the best for her (Fig. 3). The length combination she liked the most was L-2—laterals slightly shorter than the centrals and canines (Fig. 4). We submitted her preoperative photo to SmilePix for a cosmetic image (Fig. 5) and concluded with PVS impressions (Splash, Discus Dental) and a bite registration (Vanilla Bite, Discus Dental).


At her second consultation appointment, we confirmed the smile design and length combination she had previously selected by showing her a diagnostic wax-up of her upper and lower teeth (Fig. 6). Matrices were fabricated from the wax-ups before this appointment and used to make an upper and lower Slip-On Smile right on the patient’s teeth. We
loaded the matrices with an A-1 bis-acryl temporary material (examples are Temphase, Kerr; Integrity, DENTSPLY Caulk; and PERFECtemp II, Discus Dental)— and seated them in the mouth. After the material was set, the matrix was removed; remaining on her teeth was a new smile.
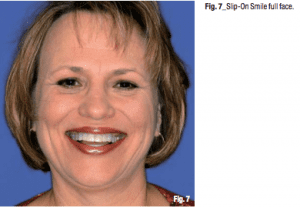
We took a series of photographs with the Slip-On Smile in place and the patient was ecstatic. She was able to see and feel what her teeth would look like before committing to any dental work (Fig. 7). The patient was truly amazed by this and wanted to wear the smile to show her husband.
Though the patient had loved the selected smile design and cosmetic image, she was not convinced about pursuing this treatment. This demonstrates that the Slip-On Smile is an important part of treatment presentation. She accepted the treatment as soon as she could experience her new smile first hand. We began her treatment with a combination of in-office and at-home whitening.
loaded the matrices with an A-1 bis-acryl temporary material (examples are Temphase, Kerr; Integrity, DENTSPLY Caulk; and PERFECtemp II, Discus Dental)— and seated them in the mouth. After the material was set, the matrix was removed; remaining on her teeth was a new smile.
We took a series of photographs with the Slip-On Smile in place and the patient was ecstatic. She was able to see and feel what her teeth would look like before committing to any dental work (Fig. 7). The patient was truly amazed by this and wanted to wear the smile to show her husband.
Though the patient had loved the selected smile design and cosmetic image, she was not convinced about pursuing this treatment. This demonstrates that the Slip-On Smile is an important part of treatment presentation. She accepted the treatment as soon as she could experience her new smile first hand. We began her treatment with a combination of in-office and at-home whitening.
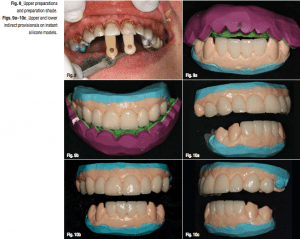
The incisals of the canines and bicuspids showed acceptable results. We used this as a base shade, planning to make the lower veneers even lighter towards the front and the upper veneers slightly lighter than the lowers. As planned, teeth #6 to 12 were prepared for Microveneers in order to preserve as much natural, healthy tooth structure as possible. Tooth #5 had an existing crown that the patient wished to replace to match tooth #12; thus, the tooth was prepared for a zirconium crown at the same time. Digital photographs of the preparation shades were taken for our ceramic artist (Fig. 8).Once the preparations were finished and refined, it was time to provisionalise the teeth. While an assistant loaded a tray with alginate, hydrocolloid (Dux Dental) was expressed over the prepared teeth for an impression. Then the alginate-filled tray was seated in the mouth, directly onto the hydrocolloid. After a minute and a half, the impression was removed with a snap and handed off to an assistant to pour.
In the laboratory, the impression was disinfected and dried. Next, Mach-2 PVS (Parkell) was dispensed into the impression to pour up the model on a vibrator. A fast-setting bite registration material (SuperDent, Darby Dental) was then placed directly onto the Mach-2 for a model base. In less than two minutes, an accurate, instant silicone model was ready on which to fabricate a provisional—all of which was completed outside the patient’s mouth by an assistant. Using the matrices made from the diagnostic wax-up and approved by the patient in her Slip-On Smile, the provisionals were fabricated.
In the laboratory, the impression was disinfected and dried. Next, Mach-2 PVS (Parkell) was dispensed into the impression to pour up the model on a vibrator. A fast-setting bite registration material (SuperDent, Darby Dental) was then placed directly onto the Mach-2 for a model base. In less than two minutes, an accurate, instant silicone model was ready on which to fabricate a provisional—all of which was completed outside the patient’s mouth by an assistant. Using the matrices made from the diagnostic wax-up and approved by the patient in her Slip-On Smile, the provisionals were fabricated.
First, the instant silicone model was lubricated with a water-based lubricant (such as KY Jelly). Next, the putty matrix was filled with bis-acryl and then placed onto the silicone model. After a minute and a half, the provisional was set up and ready to be trimmed. Because this method of temporisation involves a quick way to make a model of the prepared teeth, the provisional can be trimmed and polished in the laboratory. Finishing provisionals in this manner is much more accurate, as well as kinder to and easier for the patient, and particularly the gingival and the prepared and impressed teeth (Figs. 9a–10c). In order to prepare the gingiva for the final impressions, Expasyl (Kerr) was placed around the gum line.
Final impressions with a PVS material (examples are Take 1 Advanced, Kerr; and Virtual, Ivoclar Vivadent) were then taken in custom trays. A slow-setting material was used to record her bite registration (SuperDent). In order to cement the provisionals, the same bis-acryl was placed in the temporaries and seated in the mouth. The excess was removed with a microbrush before the material set. The patient loved the way her provisionals looked and fitted (Fig. 11).There were no surprises, as she had chosen the smile design she liked best before any work had even begun. When she returned for the final porcelain restorations, the patient was concerned that they might not look as good as her provisionals. Because the minimal preparation was all in enamel, we could try the restorations with no anaesthetic and no discomfort. This is important to allow the patient to gain a true feel of the teeth, especially when length is being increased. We assured her that we would try-in the restorations and gain her approval before seating them permanently.
Thus, we invited her entire family to the seating appointment in order to offer their opinions. As is often the case, it was especially important to please one family member in particular, and for this case it was her daughter.For the try-in, we used different shade combinations of try-in pastes in order to determine what looked the most natural. I call this the mix-to-match method. This method is especially important for extensive cases with multiple types of restorations and porcelains. In this case, feldspathic porcelain was used to fabricate the veneers, while the crown was made with a zirconium core.
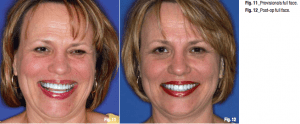
When it comes to mixing cements, we generally like to use the lightest shade for centrals and warme shades as we go distally. This mix-to-match method helps to achieve a natural-looking smile. We ultimately decided, with the patient’s input, to use a dual-cure resin cement (examples are Maxcem, Kerr; Multilink, Ivoclar Vivadent; and PermaCem Automix Dual, Foremost) for the zirconium crown on tooth #5; Cosmedent Ludicrous for #8, 9, 24 and 25; Bright for #6, 7, 10, 11 and 12; and Yellow-Red Universal for #23 and 26. A fresh bottle of bonding agent (examples are Optibond Solo Plus, Kerr; Excite, Ivoclar Vivadent; and Single Bond Plus, 3M ESPE) was selected. Using a fresh bottle ensured that the bond would be at its strongest. The teeth were cured from all angles with the FLASHlite Magna (Discus Dental). Because it is a LED, there is little danger of overheating the teeth.Once the restorations were seated, the patient was ecstatic with the results. She simply could not believe how natural her teeth looked. They were even better in shape and shade than she had anticipated (Fig. 12). The once tetracycline-stained smile was the only smile she had ever known. Now, for the first time in her life, she could look in the mirror and smile with confidence knowing she has a beautiful, natural smile.
In this case, a cosmetic image was helpful in showing the patient a 2-D photo of how her smile would look. Yet, it was not until she saw her personalised smile design in real life with the Slip-On Smile that she could really feel what her new smile would truly be like. She was pleased with every step of her smile transformation, with her provisionals and ultimately with the results. Although the mix-to-match method is an extra step that requires more chair time, the results justify the means. And for this patient, this meant a beautiful new smile with minimal tooth reduction to achieve the most natural aesthetics. Each step of this process gained more of the patient’s acceptance of the proposed treatment, which determined her appreciation of the results
